|
Here are some tips we'd suggest you
follow to extend the life of your flowers.
- Immediately re-cut the stems of each
item in the bouquet before arranging it in your vase! And use a
clean vase to avoid bacteria growth.
- Keep the vase filled with warm water containing the provided
flower food included in your shipment. We provide (4) 10 gram
food packs in each shipment. You should use one each time you
change the water for your arrangement.
- If the flower food solution becomes cloudy,
replace it entirely. If possible, re-cut stems every
3 days by removing one to two inches with a sharp
knife each time you change the water in your vase.
Do this underwater -- this allows the stems to draw
in water instead of air.
- Keep flowers in a cool spot (65 - 72 degrees
Fahrenheit), keep away from direct sunlight, cooking
or heating vents, directly under ceiling fans, or on
top of televisions or radiators. (Appliances like
televisions give off heat, causing flowers to
dehydrate.)
- Remove any leaves that will be below the
waterline. Leaves in water will promote bacterial
growth.
Other Care Related Questions
Q:
What is wrong with the water when it turns yellow or
cloudy?
A: That
is a dead give away that bacteria is growing in the
water. Not a good thing! Bacteria can clog stems and
shorten the vase life of the flowers, so keep the water
clear at all times to ensure longevity of your blooms.
If your water starts to turn cloudy, immediately empty
the vase and add fresh warm water, preferably mixed with
floral food provided we provide you with your shipment
and if possible, re-cut the stems before you replace
them in the vase.
Q:
Since flowers like sunshine, should I put my arrangement
in the sun when I get it?
A: Believe
it or not, that's not a good idea! Growing flowers like
sunshine because they require it for maturation, but
flowers that have already been cut will fade much faster
if exposed to heat and direct sunlight. To keep flowers
fresh, keep them away from sun and drafts.
Q:
Can I revive a wilted rose?
A: Actually,
sometimes you can! If a rose wilts prematurely, try
removing it from the arrangement and following these
steps: First, fill a sink with warm water. Lay the rose
horizontally in the water bath & cut the stem (about one
inch) under the warm water. Leave rose in the bath for
around two hours & let the water cool. This can work
wonders in many instances but if the rose is already
past its vase life it will not revive.
Learning about Dried Flowers
Drying Flowers
Air Drying
Dehydrator
Glycerin
Burying
Microwave
Pressing
Flowers or leaves for drying may be collected at any time during the growing
season from early spring until late fall. Always collect more material than is
needed, to allow for damage. Use only the most perfect forms. Poor shapes dry as
poor shapes. Use only plants and flowers free of insect and disease.
Damage becomes only more obvious after drying. Pick flowers when they are free
of dew or rain, preferably in the late afternoon. Place stems promptly in a container of water to prevent wilting
while gathering.
Do not be afraid to collect items with interesting curvature (Sticks, grasses,
etc) ....they could prove to be an interesting part of the arrangement.
In addition to flowers, stems and leaves that may be dried indoors, there are
many materials that can be collected in the autumn/fall and used almost directly in
arrangements after gathering.
These include many seed pods, cones, grain,
grasses and berries found in the garden as well as in fields and roadsides.
 (start of page)
Methods for drying flowers
Air drying.
There are a number of garden flowers, as well as wild plants,
that can be dried simply by hanging them upside down in a warm, dry place for
several weeks. Flowers best suited to this are the "everlastings" and
a few others that do not wilt readily. Some, such as globe amaranth, can be
dried in bunches on their natural stems. Others, such as strawflower, should
have a wire substituted for stems before drying.
Steps for air drying
Cut flowers of good quality, sometimes it is better to use
very mature flowers, when they are fully open, and well into the open cycle.
Remove foliage from stems. If stems are weak or become brittle after drying,
remove them and wire the flowers.
Group the stems into small bunches and tie with a rubber band. It will pull
tighter as the stems shrink during drying.
Hang upside down in a warm, dry, dark area such as an attic, dark garage, etc. Avoid damp rooms or direct sun on the flowers. Good air
circulation is important.
Allow to remain until thoroughly dried. This normally takes two to three
weeks.
Natural stems dried in this process will generally be fairly straight. These
may be bent for arranging by submerging the stems in warm water until they have
softened. Then, bend them to the desired position and weight them in that
position until they have dried. You can also use wire to achieve the desired
shape.
Some Flowers that are suitable for air drying.-There
are many others not listed here.
Babys's Breadth
Gypsophilia |
Button Flower
Craspedia |
Globe Amaranth |
Larkspur |
Lavender |
Strawflower |
Statice |
Yarrow |
Banksia |
Grasses
Leaves |
Using Dehydrator Machines
These machines are quite popular these days, and can be bought
quite cheaply from many stores.
They work along the principle that warm air is directed upwards and sideways
along a stack of trays, where heads of flowers can be laid ...head up or
horizontal, as well as the bunches can be held by wire, dangling down, and
moving some of the separators accordingly. The temperature and time can be set
to any level.
This system is best used for flowers that are difficult to dry by the air
method...example...Roses-Gardenias-Stephanotis-and many others.
Freeze Dried Machines are also
available, and although they can do a better job than the Dehydrator, they are
far more elaborate and expensive. Furthermore, a number of people reported re
absorption of moisture in time.
Glycerin
Glycerin is an alcohol, that is a clear,
colourles, odourles, viscous liquid when pure, and has a warm, sweet taste with
a high boiling point It is a product of the petroleum
industry, and the chemical and physical properties possessed by Glycerin
has resulted in its wide range of uses.
This includes the food and beverage
industry, medicine, cosmetics, emulsifiers, resins, cellophane and paper,
explosives, tobacco, textiles, glue and gelatin, photography, leather,
antifreeze, lubricants, rubber, cork composition, adhesives and cements,
agriculture, glass, cleaning agents, electrical equipment and metals. In the flora
preserving industry, it has the unique power of not evaporating, which means
once it is absorbed into the veins of the leaves, it will remain there and leave
them pliable.
However, one must remember that if you glycerine a stem of say,
Eucalyptus, it can remain wet if the stem is kept in a closed environment,
without enough air circulation. To the chemically minded, the formula for
glycerin is HOCH2CH(OH)CH2OH.
Preserving foliage with Glycerin
The dried flower arrangement without foliage may seem stiff and unnatural.
Leaves add much to an arrangement and can easily be preserved by a process known
as "glycerinizing." This technique makes the leaves and stems soft,
pliable and long lasting so they may be used over and over.
Select branches with the desired curves and with foliage that is not damaged
by insects or disease. In general, a branch about 18 inches or less in length is
best for glycerinizing.
Remove lower leaves, and crush or split the stem end of wood materials to
increase absorption.
Make a mixture of one part glycerin and two parts warm water. Stir well and
pour into containers so the liquid is about 4 to 5 inches deep.
Mark the level of the mixture on the container (glass containers are best)
and place the stem end of branches into it.
As the branches absorb the mixture, add a reserve mixture which contains one
part glycerin to four parts water to the original marked level.
Foliage color will gradually change as the glycerin is absorbed. It will take
from one to three weeks for most branches to glycerinize.
Some leaves, especially thick and waxy ones, may not glycerinize well by this
method. Individual leaves of plants such as ivy or southern magnolia may be
glycerinized by totally submerging the leaves into the mixture. They should be
placed in a single layer and weighted to keep them beneath the liquid. After
they become soft and pliable (2 to 6 days) they should be removed. After
removal, drain and wipe the leaves clean with a soft cloth.
It is difficult to say which leaves are best suited for glycerinizing, as sap
conditions change from leaf to leaf...the best system is one of experimentation
in your local conditions.
Some flowers respond to a mixture of glycerine and air drying....Hydrangeas
for example- these can be difficult to dry successfully, the most important step
being to cut them at the right time, invariably just when the flower finished
its flowering cycle, and just when it begins to fade. Let the stem stand in a
glycerine/water solution for a week (2 inches) then hang upside down till it
dries....alternatively just let it stand in three inches of water, till it
absorbs the mixture, then it can be hung upside down, or sometimes it dries
perfectly standing the right way up, with perhaps some support for the head.
To read a full article on the use of Glycerine refer below.
Pressing flowers
Pressed flowers are especially suitable for flower pictures, as
well as decoration on note paper, place cards and many other items.
To collect flowers for pressing, use flowers with different stages of development up to full
maturity for more variety in design. Avoid plants with fleshy stems and leaves
as well as flowers with very thin petals. Don't try to press wilted materials.
Flowers that are flat, such as pansies,leaves, etc press best.
The faster flowers dry, the better they retain color.
On the other hand, flowers can't be exposed to excessively high temperatures.
Although they may dry quickly, they will turn brown.
Pressing requires sandwiching flowers and foliage between layers of an
absorbent material. This should be clean and hold the flowers firmly and flat
during the drying process. Porous materials that allow some air movement are
also beneficial.
Flowers are generally placed between a non-glossy type of paper. Newspapers,
old telephone directories or catalogs are suitable. Absorbent facial tissues
placed on the pages aid rapid moisture absorption. Tissues should be removed and
flowers or foliage replaced between fresh, dry tissues and papers at the end of
the first week. After the flowers and tissues have been placed in the folded
newspapers or books, stack them several layers deep. Place boards beneath and on
top of the stack. Put the stack in a warm, dry place with a heavy weight on top.
Another very satisfactory system suitable for drying flowers uses a
combination of cardboard, newspaper and desk-sized blotter pads. Corrugated
cardboard is cut into sheets slightly larger than the sheets of folded
newspaper. Flowers are positioned on one side of the opened newspaper. Then the
newspaper is closed and a sheet of blotter paper placed on either side.
After all flowers have been placed between the newspapers, blotter paper and
cardboard, the layers are stacked and tied or taped together. They should then
be placed in a warm, well-ventilated place and weighted. If large numbers of
flowers are pressed, write a date on the stacks to keep track of drying time.
Special presses can be purchased or constructed for drying large quantities of
materials.
The flowers listed in Table 2 produce good results when pressed. However,
there are many others that may be used, and experimentation with those available
is suggested.
Drying mixtures for burying flowers
Flowers may be dried in their natural form by totally burying the flowers in
one of several materials.
Borax combined with sand or corn meal. One of the least expensive mixes for
drying flowers is made from sand and borax. The sand must be fine, clean and
dry. Sand is relatively heavy to work with and tends to flatten flowers unless
used very carefully.
A more popular mixture for drying is made of equal parts of borax and white
cornmeal. The cornmeal is light weight and has less tendency to flatten flowers.
It also makes boxes easier to handle and move after filling. The main function
of these materials is to hold the petals in place while they dry naturally. Good
aeration is important for rapid drying. Some people feel that the addition of
about three tablespoons of non-iodized salt per quart of mix helps petals retain
color during drying. The ratio of borax to sand or cornmeal varies widely, but
the quality of drying does not seem to differ greatly between them. Ratios
varying from 1:1 to 1:6 have been used (first number refers to borax).
Silica gel. In general, the most satisfactory material for drying flowers at
home is silica gel. Initial cost is greater than that of borax-sand or
borax-cornmeal combinations, but it can be used over and over for many years.
Since it dries flowers quickly, more flowers can be moved in and out of the
mixture during a single season than in the same quantity of a borax mixture.
Silica gel is available under a number of trade names. It is white, but some
types contain blue crystals that act as an indicator of the amount of moisture
which has been absorbed. When these crystals are a clear blue the material is
dry. As the moisture is absorbed from the flowers, the crystals gradually turn
pink. At that point it is time to re dry before using again.
To dry the material, spread the silica gel on open pans or cookie sheets in a
layer 1/2 to 3/4 inch thick. Bake in an oven at about 250 degrees until the
crystals are blue again. This may take about an hour. Stir the crystals several
times while they are drying. Keep unused silica gel in air-tight containers.
Burying flowers for drying
The method for burying flowers in any of these materials is essentially the
same. However, there are some differences in the types of containers to use, as
well as drying with either natural stems or wire stems.
Containers. Flowers dried in borax mixtures should be left uncovered during
the drying process. Therefore, low cardboard boxes with tight, strong bottoms
are ideal. This allows good air movement throughout the mixture, and if desired,
stems may be left attached and sticking out of the mix to air dry.
Flowers dried in silica gel must be placed in air-tight containers. If the
containers are not sealed tightly, the silica gel absorbs moisture from the air,
and flowers dry too slowly or not at all. Candy tins, plastic containers, coffee
cans, large-mouth jars, or any other container with a tight fitting lid may be
used. If nothing with a tight lid is available, seal loose tops with tape.
Use shallow containers to make maximum use of the drying material. The
natural stem should be removed before drying most flowers in silica gel.
Therefore, flowers wired before drying are more easily arranged later.
Wiring. Two techniques of wiring may be used — hook wiring and cross
wiring. Hook wiring may be used for daisies, marigolds, zinnias, or other
flowers with soft centers. Flowers with a harder base or center, such as roses,
should be cross wired .To hook wire a flower, use about a 20 to 24 gauge wire and
push it upward through the center of the stem, if hollow, or through about the
center of the flower. Push it out the top of the flower, bend a small hook in
the end of the wire and pull it back into the flower, hooking the center. Make
sure that the small hook is well hidden in the flower's center. If it is not, as
the flower dries, it will become visible. To cross wire a flower, push the wire
through the base of the flower at right angles to the stem. The wire is centered
in the flower base, and both ends are then bent down to form a short stem.
In shallow containers, the wires may be bent several times or simply bent out
of the way for drying. Later, they can be straightened after the flowers have
dried and other wires added to prepare them for arranging.
As most of these flowers dry, colors will darken. Therefore, extremely dark
flowers, especially in the red, purple and blue ranges, may become almost black
after drying. Whites generally develop a cream or tan color.
Burying the flowers. Flowers with wired stems are dried facing upward, and
the stems are bent or curled to lie parallel to the bottom and out of the way.
Flowers on natural stems may be dried on their sides (as in the case of spike
flowers such as larkspur or snapdragon) or upside down with stems protruding
upward. Working the drying agent between the petals is difficult when flowers
are placed facing downward. When placing flowers on the side, a brace is
necessary to hold the stems so flowers on one side are not flattened.
To dry flowers facing upward:
Place a layer of drying material in the bottom of the container about 1 to 2
inches deep.
Bend the wire stems to the side or curl up.
Place the flower on the layer of material in the bottom of the container.
Push wire stem down into material.
Gently work the base of the flower into the material so it is well situated,
petals supported and in a normal position.
Gently sift the material over the petals, making sure that all petals remain
in place as the material is added.
If any petals are bent, use a toothpick or similar item to reposition them.
Continue to add material until each flower is entirely covered.
After all flowers have been added and covered, lift the container and tap it
gently on the base to help settle the material.
After tapping, make sure all petals are still covered. If any have been
exposed, add more drying material.
Prepare for storage.
Borax combinations can be placed directly in a warm dry place without
covering. Drying will normally take two to three weeks.
Silica gel should be tightly covered or sealed if the lid is not air tight.
Flowers should dry in three to eight days. The exact time varies with the
thickness of the flower. If removed too soon, petals will droop. If removed too
late, petals become brittle and break easily.
Removing flowers from the mixtures. Since petals become fairly brittle after
drying, care is important when removing flowers from the mixture. Pour off or
gently brush to one side some of the mixture on the surface of the container. As
petals become visible, gently lift the flowers upward by placing the fingers
beneath them. Turn each flower upside down after removal and tap out any
remaining residue. If a white dust remains, remove it by carefully brushing with
a soft, dry artist's brush or gentle stream of air.
Some flowers, such as chrysanthemum, drop petals easily. These can be
reinforced by dropping glue on the bottom at the base of the petals. Use a glue
that becomes clear after drying.
Adding stems for arranging. Flowers often need wire in the stem for
arranging. A heavier wire, such as 18 gauge, may be used. Simply twist the short
wire that was placed in the flower around the stem-wire and wrap them together
with floral tape.
Microwave oven drying
Microwave drying takes only a few minutes and provides dried flowers that
look fresher and more colorful than those obtained by other methods. Support
material such as silica gel must surround and support the flowers during heating
and drying. Use heat-tolerant glass or microwave containers. Do not cover the
containers. Place a cup of water in the oven before starting to help prevent
excessive drying.
Drying times vary from about 3 minutes for very dense flowers with a lot of
petals to about 1 minute for smaller or thinner-petaled flowers. Since ovens and
flowers vary, experimentation will be required.
After treatment is complete, leave flowers in the silica gel for 12 to 24
hours to make sure they are cooled and dried. Since microwave-dried flowers tend
to absorb air moisture, spray the petals with hair spray or lacquer. For long
term storage, keep them in an airtight container.
Focal
Flowers.
When selecting flowers for an arrangement, a good rule of thumb is to select
three or four different bunches. Establish the perimeters for your bouquet with
line flowers, such as eucalyptus, bunny tail, straw or wheat. 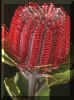 The focal flower
should be something interesting that draws the eye - straw flowers or dried seed
pods. Filler flowers, such as statice or baby’s breath, will round out the
arrangement.Your bouquet should coordinate in terms of color, texture and shape.
Keep in mind the décor of your home, where you plan to place the arrangement
and the mood you want to establish. Floral arrangements constructed of yellow
and red tones help to foster a warm feeling in a room. Blues and greens create a
cooler feeling. The focal flower
should be something interesting that draws the eye - straw flowers or dried seed
pods. Filler flowers, such as statice or baby’s breath, will round out the
arrangement.Your bouquet should coordinate in terms of color, texture and shape.
Keep in mind the décor of your home, where you plan to place the arrangement
and the mood you want to establish. Floral arrangements constructed of yellow
and red tones help to foster a warm feeling in a room. Blues and greens create a
cooler feeling.
Monochromatic arrangements, which use tints, tones and shades from the same
color family, make for a very interesting visual effect. An example would be a
bundle made up of red, pink and burgundy flowers. Strongly contrasting colors,
like red and blue, also have a lot of impact. A third design option is to use
complimentary colors such as blues and greens.
To tone down a brightly colored arrangement, add some hues of brown and
green. Jazz up a bouquet with a splash of red and yellow. Experiment with
various textures (like seed pods) and shapes to modify the look of your
arrangement. There are many varieties of textures available.
Line Flowers
The outline of the design is marked by using line flowers.
This could be in the form of foliages, like gum or other grasses, or any stem or
multiples of flowers that are smallish in diameter. The need for this parameter,
is that the eye need to perceive Balance in your design, not side or top
heavy...there is a built in sense of proportion in our visual mechanics.....The
heavy have to support the light.
Colour
At the outset, it has to be stated that no matter what laws
relate to this important subject, colour is in the eye of the beholder, what
pleases one, displeases another and viceversa.
Another basic rule is that colour is subjective not objective, meaning that
whether one line of shades is right or not, depends largely as to what is
with it, in the same room.
Finally, since a strong colour in dry arrangements comes from an artificial
source, some people have a fanatical view that they prefer things
natural....provided they realise that the downside of that, is that natural
colour in flora fades dramatically once it is cut from its source, and browning
is often the course with some exceptions. Of course, most flowers simply fade
gradually within their own colour spectrum.
The application of colour to flora comes mainly from dyes, the items are
simply inserted in solutions, made from the dye and water mixtures and then
allowed to dry. Most dyes in todays world come from artificial processing with
some minor exceptions. Spray cans offer a simpler solution, and if the quantity
of flora to be coloured is small, it is by far the cheapest method of doing
this. You have to make sure to only spray in well ventilated areas, and protect
yourself from any possible harmful fumes by wearing a mask, and gloves.
After Care
Dried flowers are delicate. Although new manufacturing processes have made
them softer and last longer, here are a few hints that will make your
arrangements last twice as long. Arrangements can last for up to 10 years,
though most professionals predict three to five. By that time, the piece may
start to look ragged and some or all of it will need to be replaced.
Dried flowers treated with a matte or gloss clear acrylic sealer will last
just a little bit longer. You can also spray any type of dried flowers with a
colored acrylic spray. One coat provides a nice, light color; two produces a
deeper tone. Moss, which tends to dry and lose its color, is a good candidate
for this method. An acrylic spray will maintain color forever.
When flowers are dried, obviously their moisture has been removed. Spraying
your flowers from time to time with a mister replenishes some of that lost
moisture. Certain flowers, such as baby’s breath or statice, should be soaked
in warm water for three to five minutes before you make your arrangement. This
trick loosens and opens the flowers, making them softer and easier to
arrange. Dried flowers continue to dry out quite significantly. If this
happens, give them a nice steam bath. Run a shower with the door closed. After
steam has collected, shut off the shower and let them sit in the enclosed room
for an hour or so. This kind of refurbishes them and will make them last twice
as long.
Keep your dried flowers out of direct sunlight, which will fade the flowers
and make them dry much quicker. Dried arrangements thrive in a household where
the average temperature is 75 degrees most of the year. If you do notice some
drying, just mist them a little bit.of water. Dried materials in storage may occasionally be attacked by one or more
household insects such as museum beetles, silverfish, roaches or others closely
related to them. As they chew on the soft tissue of the plant centers, flowers
may shatter and fall apart. They are not necessarily on the flowers as they come
from the garden but move into the boxes in the home during storage.
Occasionally check boxes, and if insects are present, destroy the infected
materials. Tightly sealed containers prevent invasion. If the pests are present,
thoroughly clean the container before using it again. Naphthalene flakes may
repel insects or some general insecticides may help control them, but once an
area is infested, complete eradication is difficult. Cleanliness and persistence
are the best means of remedying the situation.
Don't consider dried flowers as everlasting. Preferably, they should be
replaced yearly, but with good care they often last longer. Even the best dried
flowers gradually fade and should be discarded when they no longer produce the
desired effect. Flowers that tend to fade may be lightly tinted with aerosol
paints or dyes for more durable color. With care, the natural look is preserved.
Containers
The choice of container is a very important dimension in the art of flower
arranging
As a rule of thumb, the arrangement should
never be higher than three times the height of the container.
Think about your home décor, flower selection, desired effect and
where you plan to place the arrangement. For instance, a tall container would
not look particularly good in the center of your dining room table but it might
be perfect for the hallway.
In general, use a neutral container - the flowers should be the focal point,
not what’s holding them. Of course, sometimes the style of container actually
complements the flower arrangement, like using a delicate antique vase with a
classic
Victorian arrangement of roses and baby’s breath. A selection of this
kind would not look as nice in a big, heavy basket. The flowers should suit the
container chosen.
Since water is not required, baskets are wonderful for
holding dried flowers. There are all kinds of interesting baskets
available.
Dont be afraid to use something that is totally unusual like the picture on
left....or a jam jar that you just finished or a bright red tin that was used to
hold crushed tomatoes, or whatever other container that triggers your
imagination.
Tools
wire cutters scissors 2½ - 3" wood picks
a spray mister a glue gun 18-gauge stem wire
florist tape
foam a container optional clear acrylic sealer or spray
paint Preparation
Preparation
This entails assembling together all the materials that you
need for your arrangement.
Remember that you can also use artificial flowers, ie, silk, cotton, etc...this
choice is entirely yours. Some people say that they like to keep to
natural materials, hence only use dried natural flowers and foliages....others
see that their arrangement is greatly enhanced by including silk flowers...
Cut the Styrofoam to size (level with the container - not above or below it).
Using a glue gun, apply glue to the bottom of the foam and insert into the
container. The foam should fit snugly. Next, take some sheet moss, pull it apart
and work it tightly around the foam block.
The moss does not need to be glued or
held in place - the stems of the flowers will join it to the foam. Leave the top of
the foam uncovered so that delicate stems can be inserted without having to be
wired or taped. You can always fill in more moss later.
Starting
Remember these three tips for making flower arrangements:
1. Insert flowers (except for the centerpiece) at an angle into the
foam.
2. Cut wires or picks at an angle for easy insertion.
3. Tape all wires down to their ends.
Push right into the surface and remain held in place without the need of any
supportive materials
If you plan to use a delicate flower in your arrangement, you will need to
provide some support for the stem. Cut a piece of 18-gauge wire to size and lay
it a little below the base of the flower (leaving a portion of the stem clear).
Take the floral tape and pull it between your fingers to release the glue.
Floral tape will stick only to itself. Wrap the tape several times around the
top of the wire and stem. Twist the flower as you pull the tape down the stem at
an angle. The tighter the turn, the tighter the tape. Wrap the flower all the
way down to the bottom of the wire and insert in foam.
A wood pick with an attached wire works great for securing little bunches of
flowers. Layer and stagger the flowers just a little bit. Place the wood pick
close to the bottom of the flower stems. Wrap the wire round and round until the
stems are truly attached to the wood stick. If that wrapped area will be visible
in the arrangement, tape it quickly with floral tape. In addition to hiding the
wires, this step will strengthen the bond.
Shaping
What shape of arrangement do you have in mind in the first
place?
You need to be very clear as exactly what you are trying to achieve....if
necessary draw your shape outline on a piece of paper....A graph paper,
where you can draw your arrangement to scale can be helpful, until you become
proficient enough not to need this...Establish exactly how big you want it to
be, and make your scale model accordingly..from the center, draw lines
out to scale, and at the right angle..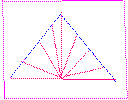
So lets assume that you are making a facing arrangement,
say an A shape.... First, set your lines for the arrangement. insert one
flower or leaf stem straight into
the center of the foam block. Imagining the surface of your foam block is a
clock face, insert another flower (at an angle) at 12, 1, 2, 3,and perhaps 4 o’clock..remember
that the length of the stems should be graduated such, that a string will just
touch the end bits, if it were to be stretched from vertical to 3 o'clock Repeat
the same on the other side, ie 12 to 9....
Emphasize these lines by inserting focal flowers,
at different angles but never passing the outline of your basic triangular
shape. A helpful hint in design here is that fine
pointed foliage and flowers (Line flowers) are always put towards the end, while
larger flowers (focal) are always towards the center.... Balance is an
important consideration.The arrangement must always look and act that it will
not topple over, does not look that it is leaning to the front or the back, or
any one side. Basically, large flowers are always put quite central and down.
You have to train your eye, to focus on what constitutes Balance, and in
reality what is pleasing to one's eye.
 The
drawing on the left, gives an outline of a table center piece as
viewed from the top. looking down on the arrangement....in this case,
the horizontal line is longer than the width, as would be suitable for example
in a rectangular coffee table .The main feature of such a design, however, is
that it has to look nice from all angles, hence this is an all round design. The
other feature to note is that the center point is the highest and then it
graduates down to container level. The
drawing on the left, gives an outline of a table center piece as
viewed from the top. looking down on the arrangement....in this case,
the horizontal line is longer than the width, as would be suitable for example
in a rectangular coffee table .The main feature of such a design, however, is
that it has to look nice from all angles, hence this is an all round design. The
other feature to note is that the center point is the highest and then it
graduates down to container level.
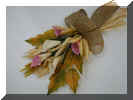
Accessories
 It
need not be assumed that all the items in a design have to consist solely of
flowers and foliages... It
need not be assumed that all the items in a design have to consist solely of
flowers and foliages...
Things that can be incorporated are....Dried Fruit in slices, artificial
fruit, vegetables, or indeed any material that is dried and lasting.
Bows made of a variety of ribbon material
 can
be incorporated, can
be incorporated,
giving an effect that you, the designer find pleasant to
look at.
Ribbons made of more rustic material seem to
compliment the looks of dried flowers better than that made of silky or
other
shiny material. Use wire to hold the ribbon loops together,
then use the flora tape to cover the wire.
if you like using a
mixture of artificial and dried flowers, by all means do so. In most cases this
will enhance greatly the final look, and certainly the strong colour of
your design.
Making
your own PotPouri??
There are many ways that one can make this...it all depends on the aroma of
your choice...
The sense of smell is as varied to humankind as ever.
General guidelines are....
Obtain leaves and herbs of your choice
A glass jar or decorative container
Mineral safflour oil or similar
Scented oil or perfume
Spices
Peppers
Directions:
Place dried flowers, leaves and herbs into a decorative bottle or glass jar.
Gently pour oil into bottle over dried material and herbs.
Add 3-4 drops of perfume, cologne or scented oil of your choice.
Place lid onto container. Shake gently to mix oil and scent together.
You may also choose to remove the lid in certain areas, like the bathroom, so
that the aroma can fill the room.
Now, if you want to use the oil, place whole peppers and herbs into glass
container and mix with oil. You can also mix in a pinch of your favorite seasons
such as dried peppers whole, thyme, ginger, cinnamon sticks,etc.
When liquid is running low, just add more oil.
You can also paint designs on your jar or vase if desired.
Be sure to cap tightly.
Preserving with Glycerine
published by courtesy of Paul Dubois, Research
Officer, Division of Horticulture, South Perth and Dr Daryl Joyce, Horticultural
Science Department, Murdoch University (Australia)
Glycerining is the term used in the ornamental cut flower and
foliage processing industry to describe the treatment of fresh plant material
with a hygroscopic (water attracting) chemical with the objective of retaining
the suppleness of the plant material.
Glycerine (glycerol) is most widely used for this purpose although many
chemicals possess hygroscopic properties. Cellulose, the major constituent of
the plant 'skeleton' is brittle when dry. Adding a hygroscopic chemical (humectant)
prevents cellulose from drying out completely, which keeps the plant material
supple.
About 50 per cent of most plant fresh weight is water, but brittleness is
usually only a problem if the water content falls below 10 per cent.
Suitable chemicals
Hygroscopic chemicals suitable for use as humectants for ornamental foliage
can be grouped into four classes: polyols (glycerol, glycols); sugars (sorbitol,
sucrose); salts (CaCl2, NACI) and quaternary ammonium compounds.
Glycerol is the most efficient humectant because it has the greatest water
attracting capacity (see Table 1). Diethylene glycol and the
polyethylene glycols have been used as humectants for ornamental foliage.
However, their lower water holding capacity means that a greater quantity is
needed for a given degree of suppleness.
Polyethylene glycols are available in a wide range of different molecular
weights. Those of interest as humectants have molecular weights ranging from 200
to 1,000. As a general rule, the water holding capacity of glycols decreases as
molecular weight increases. Ethylene glycol and propylene glycol are
hygroscopic, but are too volatile to be used as humectants for ornamental plant
material.
Sugars are used as humectants in foods. Sorbitol has approximately half the
water holding capacity of glycerol and has potential as an alternative to
glycerol because it is cheaper.
Salts are even cheaper, but are only suitable for use in high humidity
environments because most salts fail to attract sufficient moisture below 50 per
cent relative humidity (RH) to prevent foliage from becoming brittle. Calcium
chloride (CaCl2) and magnesium chloride (MgCl2) are the
most efficient humectant salts; sodium chloride (NACl) is less efficient.
Unfortunately, calcium salts cannot be applied to plant foliage by stem
absorption, but they are suitable for application by soaking (for example after
bleaching).
Quaternary ammonium compounds (for example, Comfort®) also have potential as
humectants for plant foliage in this manner.
Both the humectant (if liquid) and the water it holds will contribute to the
suppleness of treated foliage.
Water holding capacity
The water holding capacity of a humectant varies according to atmospheric
humidity. Figure
1 illustrates how the water holding capacity of glycerol varies with
humidity. It can be seen that the water content of glycerined foliage will not
vary appreciably when the atmospheric humidity is below 80% (usually the case in
Australia). In this case, because the humectant can attract only a small
quantity of water (say 20 to 40 g water per 100 g of glycerol), a substantial
quantity of humectant is required to make dried foliage supple - see Table 1.
Table 1. Comparison of the water holding capacity of
selected humectants at several relative humidities (RH)
| |
Water holding capacity
(g/100 g of humectant)
|
|
Humectant
|
30% RH
|
60% RH
|
90% RH
|
|
Propylene glycol
|
10 |
40 |
270 |
|
Ethylene glycol
|
13 |
37 |
180 |
|
1,3 Butylene glycerol
|
10 |
30 |
205 |
|
Dipropylene glycol
|
6 |
18 |
96 |
|
Diethylene glycol
|
9 |
23 |
115 |
|
Triethylene glycol
|
7 |
22 |
100 |
|
Glycerol (glycerine)
|
12 |
41 |
215 |
|
Sorbitol
|
2 |
30 |
135 |
|
Polyethelene glycol 400
|
6 |
26 |
127 |
|
Polyethylene glycol 600
|
4 |
20 |
90 |
|
Sodium chloride
|
15 |
15 |
950 |
At high humidities, all humectants absorb a great deal of water from the
atmosphere, and so proportionally less humectant is required to keep foliage
supple. At 90 per cent relative humidity, glycerol will have a water content of
215 g per 100 g of glycerol.
Therefore, to maintain suppleness in a 90 per cent relative humidity (RH)
environment will require only about one-fifth the amount of glycerol that is
required in a 60 per cent environment. Water holding capacity of humectants
varies greatly at high humidity and this causes the problem of sweating under
such conditions.
Applying humectants
Humectants can be absorbed into plant tissue either by transpiration stream
uptake or by immersing the cut foliage in a humectant solution.
Immersion method
Immersion is the less convenient method, requiring large vats, substantial
quantities of humectants, and time. Depending upon species and market, the
treatment is by immersion in a solution of 10 per cent to 50 per cent humectant
volume for volume (v/v) for one day to three weeks. Generally, immersion is used
only when the stem uptake method is impractical (for example when dealing with
bleached foliage). Calcium chloride (CaCl2) is the cheapest humectant
for the immersion method. Quaternary ammonium compounds (for example, Comfort®)
are popular, and result in a more supple product than does calcium chloride.
After immersion, the foliage is lightly rinsed in water to remove sticky
surface residue, and is then hung to dry.
Stem uptake method
Applying the humectant by stem uptake is the preferred method for
convenience, as all that is required is an airy room and buckets of humectant
solution to stand the plant material in. It is advisable to ensure that leafy
foliage is not too tightly bunched or crowded in the bucket.
Overcrowding will interfere with air circulation through the foliage. Free
air circulation is necessary for uniform absorption of the preservative solution
into all parts of the, foliage. If possible, cut the bunch ties, then rebunch
after uptake has ceased. The use of fans to create air movement can be
beneficial.
Plant material destined for glycerining by stem uptake must receive careful
post harvest handling because uptake relies on a living process (transpiration).
- During handling and transport, keep the plant material cool and out of
direct sunlight to avoid desiccation and death of the foliage.
- Minimise the time of dry handling, or the ability of the plant material to
take up the humectant solution may be impaired.
- Use only foliage consisting of full sized leaves. Avoid young, sappy
foliage as it usually wilts during the uptake process.
- Trim the stems by 1 to 2 cm immediately before placing them into the
uptake solution, to ensure that gums do not prevent solution uptake.
There is no evidence that practices such as slitting or fraying the stems
increases uptake, and in some cases they have been shown to reduce uptake.
Absorption
Absorption can be continued around the clock (if temperature and humidity
levels are suitable) by providing a continuous low level of illumination which
will allow stomata on the leaves; to remain open. It should be noted that night
time humidity is normally higher than day time humidity and so absorption at
night will be slower.
The concentration of the glycerol in the uptake, solution will increase over
time, because water will evaporate at a faster rate than the humectant. Where a
solution is to be reused many times, the concentration may easily be monitored
by checking its specific gravity or refractive index. Use either a hygrometer or
refractometer, such as is used for monitoring sugar levels in fruit.
Temperature and humidity
The rate of uptake of a humectant is dependent upon the rate at which the
stem transpires (that is loses water by evaporation from the leaf surface). Low
temperatures greatly reduce the rate of transpiration and make glycerining slow.
High humidity also reduces the rate of transpiration. These factors are
interrelated, and can be described in terms of the vapour pressure deficit (VPD)
that exists between the leaf surface and the atmosphere.
The larger the vapour pressure deficit (within reason), the greater the rate
of transpiration. VPD can be estimated with the accompanying chart (Table 2,
below). Knowing the humidity (easily measured by wet bulb temperature
depression) and temperature, a quick calculation will reveal whether glycerining
under such conditions is possible (that is the VPD is positive). If not, the
humectant solution can be heated to increase the VPD. Experiments have shown
that an acceptable rate of glycerining occurs if the VPD is greater than 10
millibars. (See the working example below Table 2.)
Table 2. Chart for the determination of water vapour
pressure (in millibars)
| |
Relative humidity (%)
|
|
Temper- ature (ºC)
|
10
|
20
|
30
|
40
|
50
|
60
|
70
|
80
|
90
|
100
|
|
10
|
1 |
2 |
3 |
5 |
6 |
8 |
9 |
10 |
11 |
12 |
|
15
|
2 |
3 |
5 |
7 |
9 |
10 |
12 |
13 |
16 |
17 |
|
20
|
2 |
4 |
7 |
8 |
11 |
13 |
16 |
19 |
21 |
23 |
|
25
|
33 |
7 |
10 |
13 |
16 |
19 |
22 |
26 |
29 |
32 |
|
30
|
4 |
8 |
12 |
17 |
21 |
25 |
29 |
34 |
38 |
42 |
|
35
|
5 |
11 |
17 |
22 |
28 |
34 |
39 |
45 |
50 |
56 |
|
40
|
8 |
15 |
22 |
30 |
37 |
44 |
52 |
59 |
67 |
74 |
|
45
|
10 |
19 |
29 |
38 |
48 |
57 |
67 |
77 |
86 |
96 |
|
50
|
12 |
25 |
37 |
49 |
62 |
74 |
86 |
99 |
111 |
123 |
|
55
|
16 |
32 |
47 |
63 |
79 |
95 |
110 |
126 |
142 |
158 |
A working example
A preserving solution will only be taken up by plant foliage if the correct
environmental conditions are provided. The VPD must be positive and should be as
high as possible (preferably greater than 10 millibars) for rapid preserving.
VPD can be established from Table 2 if ambient temperature and
relative humidity are measured. Relative humidity may be measured directly with
an inexpensive humidity probe or calculated, using a wet bulb/dry bulb
thermometer and the appropriate tables.
Taking a hypothetical example, assume that atmospheric conditions are 20oC
and 80 per cent RH. The VPD is calculated by subtracting the value of the vapour
pressure at 20oC and 80 per cent RH outlined from Table 2 (19
millibars) from the vapour pressure at 2OoC and 100 percent RH (23
millibars).
That is, VPD = vapour pressure at 100 per cent RH minus vapour pressure at
atmospheric RH = 23 millibars - 19 millibars = 4 millibars
In the above example, the calculated VPD is small (4 millibars) and
glycerining will be slow. It can be speeded up by heating the solution. Solution
temperature should not be increased beyond about 40oC, since there is
a risk of killing the foliage.
Other factors
Water quality has been found to have no deleterious effect on the uptake of
humectants (except possibly where calcium levels are extremely high). In fact,
salts such as sodium chloride (NaCl) and potassium chloride (KCl) enhance uptake
when added to the humectant solution at between 5 and 10 g/L. Similarly, a
solution pH in the range 2 to 8 does not affect uptake.
Sweating
The amount of water that a humectant will hold is dependent upon the
atmospheric humidity. At very high humidities (over 80 per cent), a small
variation in humidity will greatly affect the water holding capacity of the
humectant. 'Sweating' occurs when a sudden drop in humidity from a high level
results in a drastic reduction in the water holding capacity of the humectant,
which then releases free water. Because this water cannot evaporate quickly
enough, it collects as droplets on the surface of the plant material where it
provides an ideal environment for bacterial or fungal growth.
Sweating foliage should be hung in an area with plenty of air circulation to
allow rapid evaporation of this surface water. Sweating can be minimised by:
- keeping the level of humectant in the plant tissue as low as practicable;
- storing glycerined foliage at low humidity, and
- avoiding exposure of glycerined foliage to conditions where a rapid
decrease in humidity will occur (that is do not open storage or drying sheds
on a fine day immediately after a week of rain).
Glycerined foliage destined for humid climates can be sealed in plastic
before shipping, to prevent excessive moisture absorption in transit
Dyes
Dyes may be added to the humectant solution. Acid dyes (that is food dyes)
generally produce good results when added to the uptake solution. Basic dyes can
be used in the immersion method. Most humectants, especially glycerol, cause
foliage to brown. The darker dyes, green, red, blue and black will easily mask
this discoloration. It is often beneficial to sun bleach uptake-dyed foliage for
about a week after glycerining to bring out the full intensity of the dye.
Pastel colours require the foliage to be bleached before dyeing and
glycerining, to remove all background colour. It is imperative that all traces
of bleach be removed from the foliage before attempting to dye. Either
sulfuring, or dipping the foliage in sodium metabisulfite, before immersion
glycerining and dyeing will ensure that residual bleach is removed. See also
Farmnote no. 31/89 'Dyeing cut flowers and foliage' (Agdex 280/52) = AgFax
Document No. 23414.
Hygiene
Glycerining solutions provide an excellent environment for the rapid growth
of bacteria and fungi. These microorganisms may build up to such levels that
they block stems and prevent solution uptake. Buckets used for glycerining
should be kept clean. Residue should be scrubbed out and the buckets preferably
sterilised with 1 per cent bleach (sodium hypochlorite) between uses. The high
cost of glycerol means that the solution must be re-used several times. Thus, a
biocide should be included in the solution to suppress pathogens.
Benzalkonium chloride (for example, Alginox®) at a concentration of 0.2 g/L
is an effective biocide. Copper sulfate (0.2 g/L) may also be used unless it is
planned to bleach the foliage at a later date. Copper catalyses the
decomposition of bleach and should be excluded from bleaching solutions.
Chlorine releasing compounds such as sodium dichloroisocyanurate (DICA) at 0.2
g/L are excellent biocides but must be replenished regularly because they break
down within a few weeks. Organic fungicides such as Benlate® should not be
added to the glycerining solution because they are not water soluble and may
clog stems.
Acid dyes are incompatible with most of the above biocides. Hydroxy quinoline
sulfate (HQS) is one of the few biocides that can be included with acid dyes.
HQS is available as a fresh flower biocide (for example, Chinosol®) and should
be used at 0.2 g/L of active ingredient.
Economics
Glycerining (with glycerol) costs approximately three cents per stem (in late
1989). The glycols are more expensive and may be difficult to obtain. Sorbitol
is the cheapest of the readily available liquid humectants. Some quaternary
ammonium salts show promise as humectants. However, data on their water holding
capacity is not available.
Storage and transport
Cardboard cartons are used for storing glycerined foliage during transit Wax-
coated or plastic-lined cartons can be used for shipment to humid climates to
prevent contamination by atmospheric moisture.
Humectant quantity
The quantity of humectant needed for a supple product is dependent upon both
the nature of the plant foliage (is it naturally brittle?) and the humidity of
the intended market. Because it is the water that the humectant 'binds' which
provides much of the plasticising effect on the foliage, relatively less
humectant can be used for a market where the humidity is high. It is convenient
to consider final market humidities as either dry (about 30 per cent RH),
intermediate (about 60 per cent RH) or humid (about 90 per cent RH). Humidity
ranges for major export markets are listed in Table 3.
Table 3. Relative humidities at sources and markets of glycerined foliage
*
Mean monthly minimum or maximum
|
Location
|
Maximum % RH*
|
Minimum % RH*
|
Yearly average
|
Climate classification
|
|
Perth
|
73 (June) |
53 (January) |
62 |
Intermediate |
|
Albany
|
77 (May) |
73 (January) |
75 |
Humid |
|
Merredin
|
74 (July) |
42 (January) |
55 |
Dry |
|
Sydney
|
77 (May) |
63 (November) |
69 |
Intermediate |
|
Melbourne
|
75 (June) |
57 (January) |
65 |
Intermediate |
|
Brisbane
|
72 (March) |
66 (November) |
68 |
Intermediate |
|
Amsterdam
|
80 (August) |
70 (January) |
77 |
Humid |
|
Auckland
|
80 (July) |
74 (January) |
78 |
Humid |
|
Hong Kong
|
85 (April) |
69 (November) |
79 |
Humid |
|
London
|
89 (December) |
70 (June) |
81 |
Humid |
|
New York
|
76 (February) |
63 (August) |
74 |
Humid |
|
San Francisco
|
78 (August) |
70 (February) |
72 |
Intermediate |
|
Tokyo
|
80 (August) |
70 (January) |
80 |
Humid |
Glycerol (glycerine) is the most widely used humectant. Glycerol application
rates for some commonly preserved foliage lines have been determined
experimentally. The data listed in Table 4 (below) refers to the number of grams
of glycerol required to retain suppleness in one kilogram of fresh foliage. Note
that the lower value of the range suggested is applicable to a humid market and
the higher value would be required for suppleness in a dry environment. Some
broad leaf eucalypts and native bamboo have been found to require high levels of
glycerol to prevent leaf curl. Export of such products to humid markets requires
special care because the product is especially liable to 'sweat'.
Table 4. Quantity of glycerol required for preserving some common foliage
lines (g/kg fresh weight)
|
Species
|
Humid
|
Dry
|
|
Leucadendron
|
100 |
150 |
|
Eucalyptus
|
200 |
300-400 |
|
Bookleaf (Daviesia cordata)
|
200 |
300 |
|
Kangaroo paw (Anigozanthos)
|
200 |
400 |
|
Native bamboo (Leucopogon verticillatus)
|
300 |
400 |
Consider the data presented in Table 4 as a starting guide only. It may be
necessary to vary the quantity of humectant in order to arrive at the optimum
preserved product. It is prudent to err on the side of less glycerol (where leaf
distortion is not a factor), because the danger of 'sweating' will be reduced.
Foliage preserved with a humectant will pick up moisture in a humid
environment, and this moisture will increase its suppleness. Therefore, material
preserved at the height of the Australian summer, where the humidity may be as
low as 10 per cent, may appear dry and brittle. However, when exported to a more
humid environment, the product will pick up atmospheric water and increase
considerably in suppleness.
Humectant dilutions
Having determined the amount of glycerol for the desired end use, dilute it
with sufficient water to give a concentration of about 20 per cent v/v or 1:4
(one part glycerol to four parts water). For plant species where leaf or flower
drop can occur during glycerining (for example, Stirlingia), increasing
the glycerol concentration to about 30 per cent (1:2) can minimise the problem. Leucadendron
glycerines best when the glycerol is diluted to about 10 per cent v/v (1:9).
Note that most humectants are viscous liquids, and should be thoroughly mixed
with the water by stirring; otherwise, they will settle to the bottom of the
container. |


